Stacking Proxies With Burp Suite’s Upstreams
Ahhh, remember the good old days of web application penetration testing, when your client would simply spin up a test instance of their web application and lock it down to your Red Team’s VPN gateway IP address? Ahhh, those were the days … All that we had to do to prepare for the test was to ensure our tools were up to date, connect to our Red Team’s VPN, and ensure that we could access the URI(s) of the target(s).
For good security maturity reasons, it seems like more and more clients prefer to have me pentest internal web applications for them. These could be homebrew web applications or solutions that they employed from 3rd party vendors. In either case, clients may keep these applications behind the firewall for many good reasons:
- sensitive data;
- sensitive data; and
- sensitive data.
Oh, did I mention sensitive data? Well, to be fair, I didn’t say “many different good reasons” :)
What is an Internal Web Application?
Internal web applications are web applications that are only accessible from within the client’s domain(s). This means that the client will either require the Red Team to either:
- use the client’s VPN to connect to the internal network;
- send to the client a “drop box” or “implant” box in the form of a small computer or NUC and connect via a reverse SSH/VPN established by the NUC;
- connect to an internal-domain system via RDP; or
- sometimes use a combination of these - which we will see in this post.
I mean, there’s always going “on site” but, why?
Proxies and Stacking
So, let’s talk about the meat of this post: the connections to access an internal web application. There are multiple tools that we can use to create and use proxies, and sometimes (as we will see later) the client has proxies already made for us to use. But, we will be sticking to OpenVPN, SSH, and Burp Suite for this post.
0x00: Sorry, No Proxy
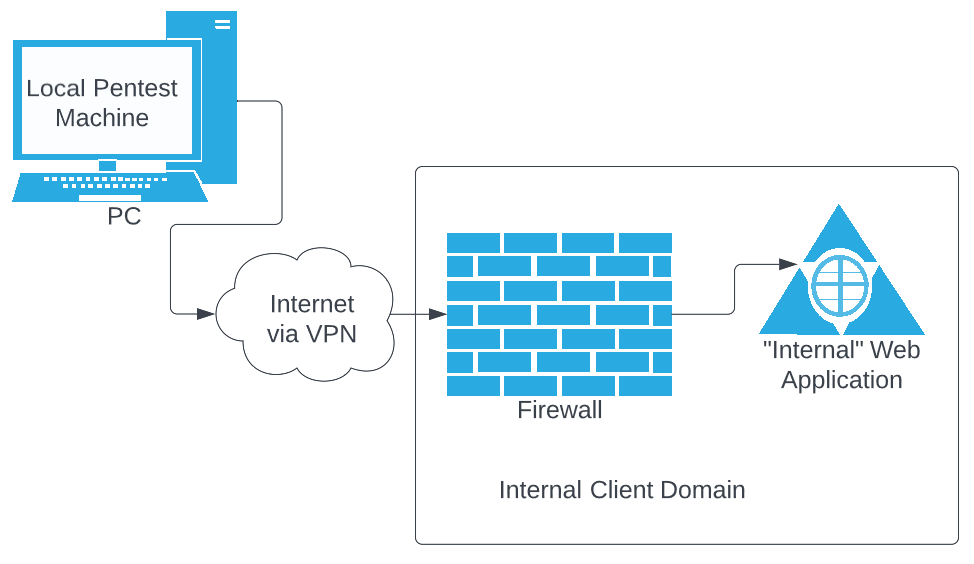
This is the easiest way to conduct a web application penetration test for a client’s internal web application. We simply connect to the client’s domain via VPN and we are good to go. A simple visualization of this would look something like the following figure below.

Figure 0.0 No proxy, just a straight VPN connection. Easy Peasey.
0x01: The Tall Stack (Single Internal Hop)
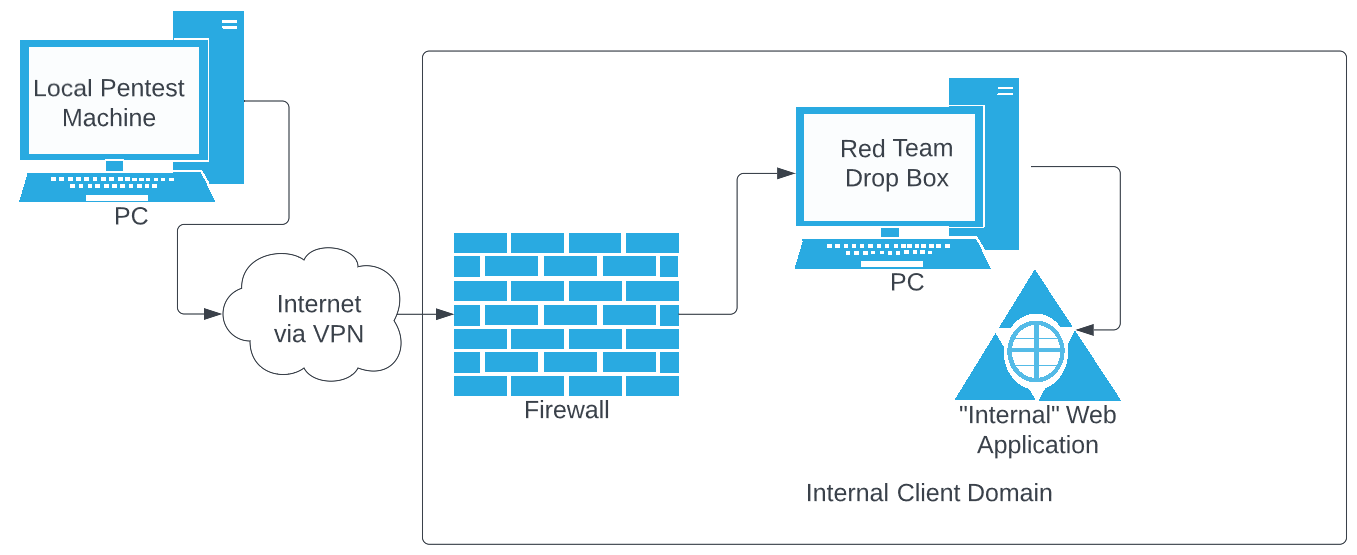
The next scenario we will explore is not too complex. The reason why it exists is because, sometimes a client may have their internal web application firewalled off to only accept HTTP(S) requests from certain IP addresses. If they are lenient enough to simply open it up to a drop box (or “implant” box), then all the penetration tester has to do is prep a box and ship it to them. If this box was already on site, say from a previous penetration test/engagement, and does not have internet access (or does and is unbearably slow with a reverse SSH tunnel), we may still find ourselves wanting to use our own local machine to conduct the web application penetration test. We can do this using an SSH tunnel to the drop box over VPN.
- connect to the client’s VPN; and
- create a proxy to the drop box using SSH like so,
ssh -i (PUBLIC SSH KEY) (USERNAME)@(DROP BOX IP) -qD 9050
Then, each time we want to run a tool, we call upon the power of proxychains like so,
proxychains wfuzz -w (WORDLIST) https://(URI TO WEB APP)/FUZZ.aspx
as long as our /etc/proxychains.conf file states that 9050 is the socks proxy to use. To use this simple proxy with Burp Suite, all we have to do is set it
to use our local SSH proxy that we made using the commands above. We do this by:
- starting Burp Suite (does not have to be the “Professional” version);
- click the “user Options” tab;
- under “SOCKS PROXY” set the
- Socks Proxy Host to
127.0.0.1 - Socks Proxy Port to
9050
- Socks Proxy Host to
Now, when we make HTTP requests, they will all be tunneled through our SSH proxy on port 9050. There’s no need to start Burp Suite with proxychains and I have
not had any luck doing it that way anyway, so I stick to this method. A simplified network diagram of this in action can be seen in the figure below.

Figure 1.0 A single Proxy Host - 1 Internal Hop to Get to the Internally-accessible Web Application Using a Drop/Implant Box
0x02: The Grande Stack (2 Internal Hops)
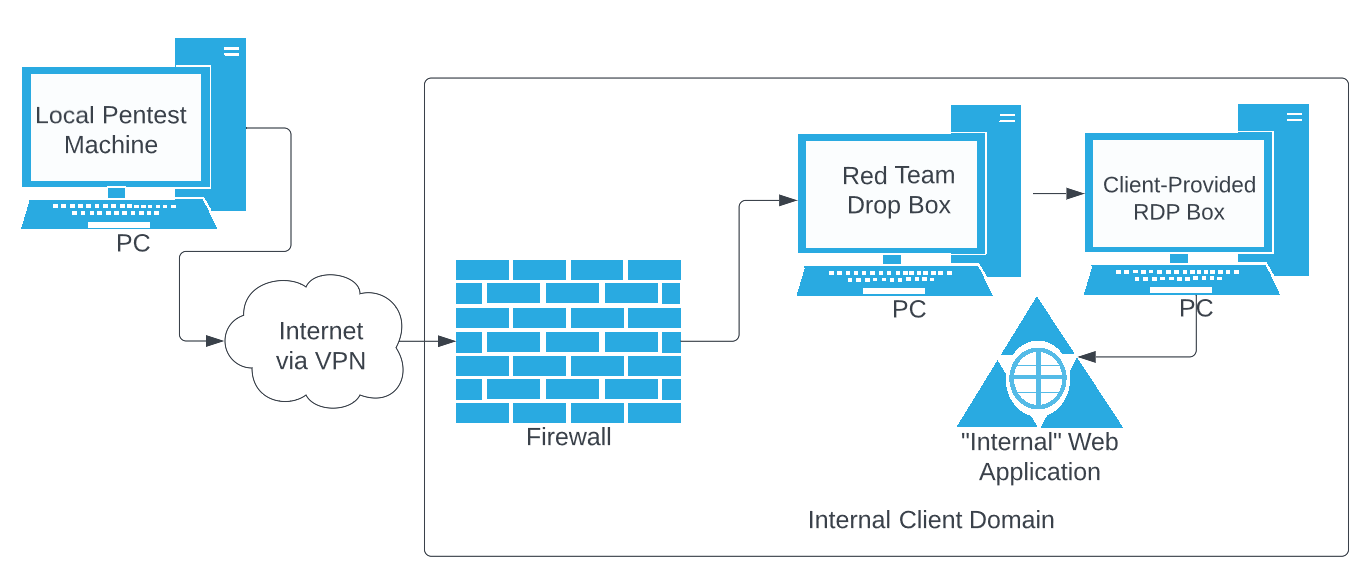
Now, this is were things get a bit dicey. Sometimes the client’s environment has the target web application locked down to only accept HTTP(S) requests from a single (or multiple) specific host(s) on their internal network and are not willing to create firewall rules for a drop box or implant box for the tester to use. In this scenario, the client may provide us with RDP access to another domain-bound computer for us to use so that we can access the internal web application.
This is were our first Burp Suite Upstream proxy comes into play. During your preengagement calls, we must ensure that we have local admin access to this RDP box, or that Burp Suite is installed on it before your start date. The reason why is because we will be using the RDP box as a proxy from our attack box to the target internal web application. Since we have RDP access to this box and Burp is installed, we could technically just use Burp Suite on this box, but it’s Windows and sometimes client’s boxes are very secure and the clients may also not be willing to provide local administrative access to the tester. Again, some testers prefer to use their own local host to perform penetration tests, especially if the local OS or VMWare Image was meticulously prepped for a professional penetration test. So, what if we want to use other tools, such as SSLSCan, Wfuzz, or Nikto? Well, we can use these tools in our local host using a small stack of proxies like so:
- connect to the client’s network using VPN;
- RDP to the box provided by the client;
- start Burp Suite (does not need to be the “Professional” version);
- click on the “Proxy” tab;
- click on “Add” under the “Proxy Listeners” section;
- add a new proxy with the following specifications:
- choose a port that is not currently in use (let’s say we use 8888)
- choose to either listen on your RDP hosts specific IP address, or all interfaces.
- Next, on our local machine, we set Burp Suite to use a proxy. We will use port
9050which is our current SSH proxy to our drop box on the client’s network; - Finally, we set an Upstream Proxy to be that of the RDP host that the client provided along with the Burp Suite proxy listener port:
8888
That’s a lot to take in, I’m sure! Let’s take a look at this in the figure below.

Figure 2.0 Medium Stack Proxy with 2 Internal Hops To Access The Target Internally-Accessible Web Application
0x03: The Venti Stack (3 Internal Hops)
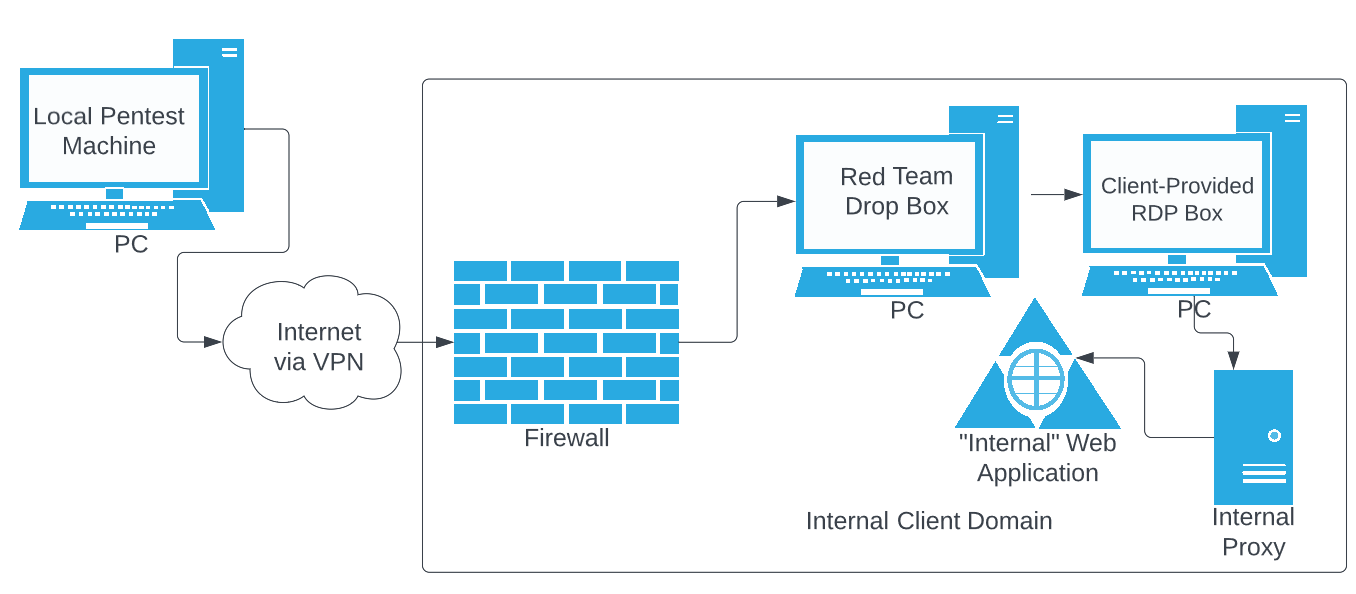
So here is where things get really weird. I was on an engagement to do an internal penetration test which required “the Grande Stack” above. When I was using doing preliminary testing using the web browser on the client-provided RDP box, I noticed something odd: The HTTP requests worked in the browser, but not in Burp Suite on the same (RDP) host. A co-worker told me to check for a proxy in the browser and sure enough, one was listed. So here is our Venti stack: everything from 0x02 above with one additonal step: a SECOND upstream proxy. Using the same method as we did to add the Upstream Proxy to our local pentester machine, we will add one to the client-provided RDP box’s Burp Suite instance as well. I simply took the details of the proxy from the browser and plugged the values in. Viola! It was working. This is what our netwoprk diagram looks like in the figure below.

Figure 3.0 The behemoth Venti Stack to Access The Internal Web Application - 3 Internal Hops
This is hard to articulate so let me lay it out one more time:
Local Box
- OpenVPN connection into client network
- SSH Tunnel port
9050to drop/implant box sent to the client - Burp Suite:
- Proxy: SSH Tunnel
9050on localhost - Upstream Proxy: IP address of RDP box provided by client, Port made from starting a new proxy listener on all devices
- Proxy: SSH Tunnel
RDP Box On Internal Client Domain (Provided By Client)
- Burp Suite:
- Start new proxy Listener: All devices Port
8888(or other unused port) - Upstream Proxy: IP address and port of proxy taken from browser
- Start new proxy Listener: All devices Port
One thing to note: When I did my test this way, it was unbearably slow. In fact, I feel ike only about 25% of my HTTP requests were making it through this convoluted stack of proxies. It was awful to say the least!
Issues You May Encounter
So, as mentioned, the Venti stack was a severe pain in my ass. But, it is now part of my work life whether I like it or not. Some issues that I came across all seemed to stem from my RDP session to the client’s domain-bound system.
HTTP 407 Proxy Authentication Required
If you see this message while running wfuzz or some other scanning tool, you may need to unlock the RDP session screen and refresh the target web application in the browser of the RDP box. I know this seems weird, but it was working for me. It’s like giving the client’s internal domain proxy connection from the client’s RDP box CPR.
Local Burp Suite Starts Prompting For Credentials
This may be the same issue as listed above, because it was resolved in the same way.
Site Cannot Be Reached from Local Testing Machine
This requires a step-through like troubleshooting process. Be patient. Try each node individually. This may be the stack of proxies’s(?) fault, or a firewall rule that is blocking you. I overcome issues like these by testing the stack in the following order:
- First and foremost - Ensure that you can access the internal target web application on the RDP box in the browser!
- Ensure that your local Burp can connect to the drop/implant box that you sent your client.
- Start an HTTP server on the drop box using Python3 with
python3 http.server 9999and attempt to access it from your local instance of Burp Suite on your local host.
- Start an HTTP server on the drop box using Python3 with
- Ensure that you can access the RDP box’s Burp Suite Proxy Listener
- Remember that port we opened on “all devices” on port
8888? Well, ensure that the Upstream Proxy set in your local instance of Burp is set to that. - You can trouble shoot it by turning “Intercept On” in the RDP’s Burp Suite and see if your local Burp Suite’s requests are even making it to the RDP box.
- Remember that port we opened on “all devices” on port
- Again, check for domain proxies on the RDP box - this threw me through the ringer while trying to troubleshoot!
- If a proxy exists, see if you can access the internal web application from the RDP box’s Burp Suite once the domain proxy’s IP/port is set as the RDP box’s Upstream Proxy.
Conclusion
I sure hope this falls into the right hands as I myself was struggling to conceptualize exactly what was going on in this abstract set of proxies. I truly wish that the Venti stack could be avoided at all costs due to the house-of-cards setup and slow speeds we may encounter during an internal web application penetration test. But, alas, as penetration testers, it’s all about speed, ball bearings, and adaptability to our client’s security maturity.
~Douglas